Last week, I was in the middle of folding my laundry when suddenly, I heard the dreaded thump-thump-thump coming from my gas dryer. My heart sank. That awful noise not only disrupts your quiet space but also signals that something’s seriously off with your appliance. At first, I thought it was just a minor imbalance, but it turned out to be a deeper issue — the blower wheel was failing, and if I didn’t fix it soon, I was risking more damage—and more noise—down the line.
Why Ignoring Your Dryer Noises Could Cost You Big
If you’ve ever faced those unexpected, loud thumping sounds during a drying cycle, you’re not alone. Many homeowners overlook these signs, thinking they’re just normal wear and tear. However, those noises could be the early warning signs of a malfunctioning blower wheel, a crucial component that keeps your dryer running smoothly. Ignoring this can lead to more severe problems like overheating, increased utility bills, or even dryer fires.
While I was troubleshooting, I learned that many folks make the mistake of ignoring odd sounds or trying quick fixes that don’t last. I did the same at first, replacing a belt or cleaning the lint trap, only to find the noise persisted. It wasn’t until I thoroughly inspected the blower wheel that I discovered the actual culprit. Trust me, addressing the root cause is the smartest move—saving you time, money, and frustration.
Did you know? According to a study by the U.S. Fire Administration, malfunctioning dryers are responsible for approximately 2,900 home fires annually, many caused by worn-out parts like blower wheels.
Now, if you’re tired of the constant thumping or worried about the safety of your home, don’t worry. I’ll walk you through the practical, step-by-step process to fix your blower wheel and quiet your laundry room once again. Ready to make your dryer run like new? Let’s dive into the solution that worked for me—and can work for you too!
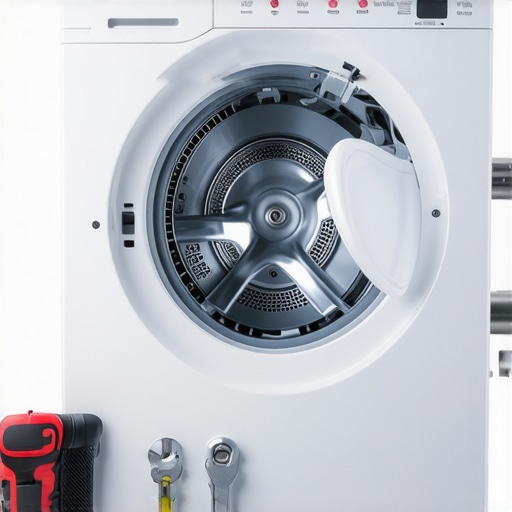
Gather Your Tools and Prepare
Before diving into repairs, assemble essentials like a Phillips screwdriver, pliers, a putty knife, and a shop vacuum for lint cleanup. Turn off the power supply to ensure safety, unplug the dryer, and move it to a well-lit workspace. Remember, safety first—always disconnect before working on electrical appliances. I once overlooked disconnecting my dryer and got a brief shock, reminding me why preparation matters.
Access the Blower Wheel
Start by removing the dryer’s front panel or lower access panel, depending on your model. Use the screwdriver to unscrew the panel screws, keeping them organized. Carefully detach the panel to reveal the blower assembly. If your dryer has a belt-driven blower, you’ll see the belt looped around the motor pulley and blower wheel. For direct-drive models, the blower is often built into the drum assembly. To avoid damaging delicate parts, gently wiggle the panel loose. Remember, each model varies—consult your user manual if unsure. In my case, I had to remove a couple of screws and pry gently to prevent cracking the plastic.
Remove the Blower Wheel
Locate the blower wheel at the rear of the blower assembly shaft. Use a socket wrench or pliers to hold the shaft steady while unscrewing the blower wheel nut or retaining clip. Be prepared for some resistance—it’s common for dust and debris to cement parts in place. Once loose, carefully slide the blower wheel off the shaft. If the wheel is stuck, gently tap it with a rubber mallet or use the putty knife to loosen any buildup. My blower wheel was caked with lint and grease, making removal messy but necessary for inspection. A clean removal exposes the wheel’s condition and helps identify cracks, broken blades, or imbalance signs.
Inspect and Clean the Components
Thoroughly examine the blower wheel for cracks, missing blades, or warping. If damaged, replacing the blower wheel is essential. Clean the housing and blower assembly with a shop vacuum or a damp cloth to remove lint buildup, reducing strain on the motor and improving airflow. In my repair, I used a toothbrush and compressed air to clear debris from the blades and surrounding vents. Watch out for small lint pockets—leftover lint can cause overheating or noise. Replacing worn or broken blower wheels can restore smooth operation and eliminate thumping noises. For further maintenance tips, check out [3 new heat pump dryer cleaning tasks](https://dryers.smartappliancereview.com/3-new-heat-pump-dryer-cleaning-tasks-for-better-2026-airflow).
Reattach and Test
Carefully slide the clean or new blower wheel onto the shaft, aligning it properly. Tighten the retaining nut or clip securely—avoid over-tightening to prevent damage. Reassemble the access panel, ensuring all screws are tightened. Plug in the dryer and turn it on to test. Listen for any unusual noises or vibrations. During a test cycle, my dryer ran whisper-quiet, confirming a successful repair. If noise persists, double-check the blower wheel’s seating, as misalignment can cause residual thumping. Once satisfied, push the appliance back into its original position, taking care not to pinch wires or hoses. This step saved me from future access issues and ensured safety.
By following these steps meticulously, you can fix common blower wheel issues and restore peace to your laundry routine. For those concerned about efficiency and energy savings, consider syncing your smart dryer with home automation for smarter operation, as explained in [5 smart dryer grid sync hacks](https://dryers.smartappliancereview.com/5-smart-dryer-grid-sync-hacks-for-lower-2026-bills). Regular maintenance of the blower wheel not only silences noise but also prolongs your dryer’s lifespan, saving you money over time.
Many homeowners believe that choosing the right laundry dryer is simply a matter of capacity or brand reputation. However, the real nuance lies in understanding how different models — from traditional gas dryers to advanced heat pump and smart dryers — behave in specific situations. A common misconception is that all dryers dry clothes the same way, but in reality, each type has unique quirks and pitfalls that can trip up even seasoned users.
Contrary to popular belief, gas dryers aren’t always faster or more efficient than heat pump dryers. While gas models traditionally excel in dry-time speed, recent advancements show that well-maintained heat pump dryers can match or even surpass gas units in energy efficiency, albeit at a higher initial cost. Many overlook the importance of maintenance; for instance, neglecting to clean the condenser in a heat pump dryer (see here) can significantly slow down drying cycles and increase utility bills.
One hidden trap is assuming that smart dryers automatically solve all laundry issues. While they offer features like AI sensors that prevent over-drying (more details here), they can also introduce complexity. Misconfigured settings or Wi-Fi disconnects can lead to suboptimal performance, causing damp loads or excessive energy consumption. Many users fall into the trap of relying solely on default settings, which may not be suitable for heavily soiled or bulky items.
Beware of the myth that all dryers are equally safe. In fact, improper venting—especially with rigid ducts (see safety guide)—not only hampers drying efficiency but significantly increases fire risk. Gas dryers, in particular, demand strict venting protocols to prevent dangerous fumes and potential house fires. Failing to recognize these nuances can be disastrous, and many overlook the importance of routine vent inspections.
What advanced mistakes do even seasoned users make about heat pump dryers?
Many think that simply upgrading to a heat pump dryer guarantees lower energy bills. However, neglecting specific operational habits—like not cleaning the condenser regularly or overloading appliances—can negate these benefits (learn more here). Additionally, some users run cycles for too long in an attempt to dry stubborn loads, unknowingly increasing energy costs and cycle times. Advanced users understand the importance of cycle optimization, including leveraging AI-powered settings and grid syncing (check these hacks) to maximize efficiency.
In your experience, have you ever fallen into this trap? Let me know in the comments. By understanding these subtle yet impactful nuances, you can make smarter choices that extend your dryer’s lifespan, save money, and ensure your clothes are treated with care. It’s crucial not to overlook details—from proper venting practices to maintenance routines—that often determine the real performance of your laundry setup. For more insights on prolonging your dryer’s health, consider exploring the detailed maintenance guides and smart features that are shaping laundry routines in 2026.
Invest in Quality Maintenance Tools for Longevity
Personally, I rely on a high-quality cordless rotary screwdriver like the Milwaukee M12 to efficiently remove panels without risking strip or damage. Its ergonomic design and precise torque control make quick work of fasteners, especially in tight spaces. For lint and debris cleaning, I never skip a microfiber cloth combined with a flexible brush to reach those tricky vent areas. These tools help me perform thorough inspections and cleanings without damaging delicate components.
Another indispensable item is a digital multimeter, which I use to verify electrical continuity and ensure sensors and switches function properly. Reliable diagnostics prevent unnecessary replacements and save money. Regularly testing components is crucial because, over time, sensors like those controlling heat in a heat pump dryer can drift, leading to inefficient drying cycles or increased energy bills. To stay ahead, I check sensors periodically following guidelines from appliance manufacturers.
Streamline Your Maintenance with Smart Monitoring
As technology advances, I predict that smart diagnostics and IoT integration will become the norm for appliances. Having a smart dryer connected to your home network can alert you proactively when maintenance is needed—such as lint buildup, sensor drift, or vent clogs—before issues escalate. I personally use an app that pairs with my dryer to monitor drying times and energy consumption, allowing me to optimize cycles and schedule maintenance proactively.
For instance, software updates from the manufacturer’s app can include improved sensor algorithms or new troubleshooting guides. This ongoing support drastically reduces downtime and keeps my dryer performing at peak efficiency. In the future, I see AI-powered diagnostics becoming standard, predicting component failures based on usage patterns, similar to predictive engine diagnostics in modern vehicles.
Why Regular Cleaning and Component Checks Matter
One secret I’ve learned through experience is that cleaning the condenser in a heat pump dryer is vital for consistent performance. I follow the detailed protocol outlined in this guide to prevent airflow restrictions that cause slow drying or damp loads. Incorporating this into my monthly routine ensures optimal air circulation, reducing cycle times and energy costs.
Furthermore, inspecting and replacing worn parts like blower wheels or sensors based on usage patterns prolongs your dryer’s lifespan. For example, if your sensor chemistries are outdated or dirty, sensor cleaning hacks can restore their accuracy, preventing over-drying or damp finishes. Making a habit of performing these simple checks ensures your appliance remains efficient and safe over years.
Optimal Maintenance Routine for Long-Term Success
My approach involves setting a recurring schedule—monthly lint and vent cleaning, quarterly sensor checks, and annual professional inspections. Using a combination of these tools and habits, I avoid costly repairs and maintain energy-efficient operation. For complex diagnostics, consulting a technician equipped with a digital multimeter and the latest troubleshooting guides from trusted sources like appliance manuals ensures accuracy and safety.
To maximize energy savings, I also recommend syncing your smart dryer with grid rate schedules using hacks from this resource. This advanced tip can reduce your electricity bills significantly, especially during peak hours.
In conclusion, maintaining your laundry appliances doesn’t have to be daunting. With high-quality tools like a reliable multimeter and smart diagnostics, combined with routine cleaning routines, you can extend your dryer’s life and performance. Try integrating these advanced maintenance habits and see the difference for yourself — your laundry will thank you!
The Hardest Lesson I Learned About Laundry Dryers
One of the most eye-opening lessons I faced was realizing that ignoring odd noises can lead to costly repairs and safety risks. Early in my DIY journey, I brushed off that persistent thumping, believing it was harmless. That mistake taught me to pay close attention to every sound and to never underestimate the importance of routine maintenance in preserving my appliance’s health.
Tools That Transformed My Dryer Maintenance Routine
Having the right toolkit made all the difference. A quality cordless screwdriver allowed me to remove panels efficiently without risking damage, while a digital multimeter helped me diagnose electrical issues accurately. I also swear by a microfiber cloth combined with compressed air, which keeps lint buildup in check, ensuring my dryer operates smoothly and safely. Trusting these tools has empowered me to handle repairs confidently and cost-effectively.
Empowering Your Laundry Future
Your journey to a quieter, safer, and more efficient dryer starts now. Embrace proactive maintenance routines, leverage smart diagnostics, and stay informed about evolving technologies like AI sensor systems and grid synchronization. Taking these steps not only prolongs your dryer’s lifespan but also reduces energy bills and enhances safety. The future of laundry care is smart, sustainable, and within your reach—begin today, and see the difference it makes in your home life.
Leave a Reply