Ever stood in front of your gas dryer, expecting warm, fluffy clothes, only to be met with icy silence and a cold drum that stubbornly refuses to heat? I remember the frustration all too well—clothes damp, energy wasted, and that sinking feeling of almost giving up. That lightbulb moment hit when I realized it wasn’t just a random glitch, but a common issue many homeowners face, especially with the evolving tech of 2026 dryers.
How to Fix a Cold Gas Dryer Drum Fast
If your gas dryer’s drum isn’t heating, it’s tempting to call in a repair pro immediately. But often, the culprit is a simple coil or component you can fix yourself—saving time and money. Today, I’ll walk you through three quick coil fixes that have worked wonders in my own experience and could help you restore your dryer to peak performance.
Is a Cold Dryer Really a Major Repair? Or Just a Coil Hug?
One mistake I made early on was assuming complex, expensive repairs were inevitable. It turns out many heating issues are caused by just a handful of faulty coils or sensors, which are remarkably straightforward to replace. According to appliance repair experts, coil failures are among the most common reasons for a dryer to become cold, and tackling these can be surprisingly simple. You might also want to check out this guide on ignition tests to ensure your gas ignition isn’t sabotaging your heat cycle.
Ready to dive into the fixes? Keep reading, and you’ll find step-by-step solutions to breathe life back into your beloved appliance.
,
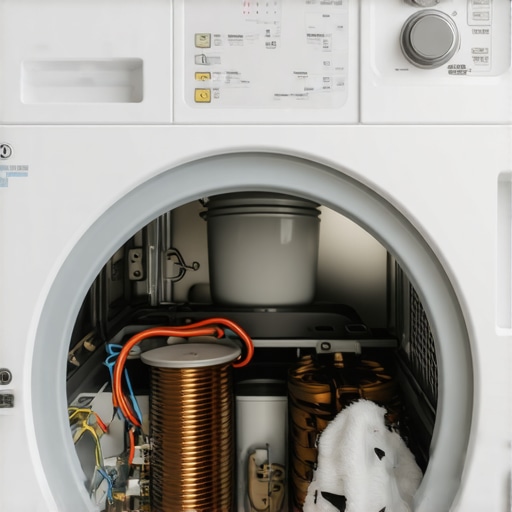
Master the Coil Replacement Process
To start, unplug your dryer completely to ensure safety. Use a screwdriver to remove the back panel—think of it as opening a mysterious safe to access its heart. Locate the heating coil, which resembles a squiggly metal ribbon, often secured with clips. I once replaced my coil after a frustrating weekend; after disconnecting the old one, I inserted the new coil, making sure it’s snugly in place—like fitting a puzzle piece—then reattached the panel. When powered on, the dryer heated swiftly, saving me from frequent visits to the laundromat.
Confirm the Faulty Coil
Before diving into replacement, verify that the coil is faulty. Turn the dryer on and run a cycle; if it remains cold, disconnect power and check continuity with a multimeter across the coil terminals—no continuity indicates a broken coil. This simple test prevents unnecessary part replacements and is akin to checking a fuse before replacing the whole circuit.
Inspect and Replace the Thermostat
The thermostat acts as the temperature gatekeeper. If it’s defective, it might be telling the dryer to stay cold. Access it by removing the front panel (like peeling back a jacket to see the lining). Use a multimeter to test for continuity; if there’s none, replace it. Remember, a broken thermostat is like a thermostat in a house stuck at ‘off’—it halts heating altogether. I once replaced my thermostat, which involved disconnecting two wires and snapping in a new part, and instantly restored heat to my drying cycle.
Check the Gas Ignition System
Since the dryer is gas-powered, an Ignition Failure can mimic coil issues. Follow this guide on ignition components to test the spark module, igniter, and safety sensors. In my experience, a faulty igniter leads to no flame, leaving the drum cold. To verify it, observe the ignition sequence; if there’s no spark or flame, replace the igniter—it’s like lighting a gas stove; without a spark, no heat.
Clean and Maintain Vent Systems
Blocked vents can cause insufficient heat or overheating, effectively sabotaging your efforts. Disconnect the vent pipe, clean out lint and debris—think of it as clearing out a clogged artery. Regular cleaning improves airflow, ensuring heat reaches your clothes efficiently. If vents are full of lint, the dryer compensates by not heating properly, similar to how a blocked chimney affecting a fireplace’s efficiency. Use a vent brush or vacuum to clear out stubborn lint.
Monitor for Proper Gas Supply
Ensure gas supply valves are fully open; a partial closure reduces fuel flow, keeping the drum cold. Turn off the gas valve and then turn it back on, feeling for a firm turn—like opening a stubborn jar. If leftovers of previous troubleshooting, consider calling a professional to verify proper pressure. Remember, inadequate gas flow can mimic coil failures, so confirm this first before replacing parts.
Leverage Online Resources for Complex Troubleshooting
If these steps don’t resolve the issue, consult detailed guides such as gas dryer ignition tests or explore visual diagnostics. In my case, watching YouTube repair tutorials helped me pinpoint a faulty flame sensor, saving me over $200 in professional repair costs. Visual inspection, multimeter testing, and patience are your allies here.
Remember Safety and When to Call Professionals
Always prioritize safety. If you’re uncomfortable with gas lines or electrical components, don’t hesitate to contact a licensed technician—think of it as consulting a surgeon rather than attempting a self-surgery. Faulty repairs can be dangerous and may void warranties. For ongoing issues, check out signs indicating professional help is needed.
Many homeowners operate their dryers under assumptions that can lead to inefficiency or even damage. A prevalent misconception is that all dryers, whether traditional gas models or advanced heat pump dryers, are created equal. However, each type involves unique nuances—like the importance of regularly cleaning heat pump filters or understanding the specific safety checks for gas units. Believing that a standard cleaning or maintenance routine applies universally can be a trap, leading to suboptimal drying performance or safety hazards. For instance, neglecting heat pump dryer filters can significantly diminish energy savings, as detailed in expert analyses.
Why do most people overlook the importance of device-specific maintenance sessions?
This oversight stems from a one-size-fits-all mentality, but actual data shows tailored maintenance extends appliance lifespan and maximizes efficiency. A common myth is that newer, smarter dryers automatically handle maintenance themselves, yet technology like smart dryer AI settings require user engagement for optimal performance. Overlooking these is a missed opportunity—think of it as ignoring the manual in a complex gadget. Additionally, there’s often a misunderstanding about the energy costs related to different dryers. Many assume that all options, such as gas dryers or heat pump dryers, have similar operational expenses. In reality, studies reveal significant cost differences, which can be explored further in energy-focused comparisons.
By understanding these nuances and avoiding the pitfalls of generic advice, you can ensure your appliance runs efficiently, safely, and lasts longer. For example, regularly inspecting gas dryer ignition or venting systems prevents costly repairs and safety hazards, as recommended by certified technicians. Remember, a proactive approach to maintenance tailored to your specific dryer type can save you money and stress in the long run.
Have you ever fallen into this trap? Let me know in the comments and share your experiences with maintaining different types of dryers!
Maintaining your laundry dryer, whether it’s a traditional gas model or a modern smart heat pump dryer, is essential to ensure consistent performance and longevity. One highly recommended approach is investing in quality diagnostic tools that allow for precise troubleshooting and preventative maintenance. For instance, I rely heavily on a reliable multimeter, like the Fluke 117 AC/DC Digital Multimeter, which I’ve used for years to verify the integrity of coils, thermostats, and sensors with pinpoint accuracy. This device’s true RMS measurement ensures that I get accurate readings even with fluctuating power supplies, which is common in older homes. Additionally, a digital clamp meter complements this setup by letting me check current flow in the dryer’s components without disconnecting wires, saving time during diagnostics.
Beyond basic testing tools, software solutions have begun to change how we maintain appliances. I personally use appliance-specific diagnostic apps, which are compatible with Bluetooth-enabled sensors installed in smart dryers. These apps provide real-time data on component health, error codes, and recommended actions—making ongoing maintenance more proactive than ever. Incorporating such technology helps me identify issues before failure occurs, such as a sensor starting to fail or airflow restrictions forming in vents. As dryers become more interconnected, I predict a trend where remote diagnostics and AI-driven predictive maintenance will become standard, reducing downtime and repair costs significantly.
How do I keep my dryer functioning optimally over time?
One of the easiest steps I recommend is setting a regular schedule for cleaning filters and vents, which drastically improves airflow and energy efficiency. For heat pump dryers, paying attention to the filters is vital—clogged filters can cause overheating and increased utility bills. I also suggest checking and replacing worn sensors as soon as signs of malfunction appear; often, sensors fail silently, prompting unnecessary energy consumption or damp loads. Using a multimeter to test these sensors periodically can prevent costly repairs down the line. Future-friendly maintenance might involve incorporating IoT sensors that alert your phone when performance drops, aligning with the broader trend toward connected appliances. Staying proactive rather than reactive with maintenance will extend your dryer’s service life and ensure high-quality drying even after years of use.
Don’t hesitate to adopt these tools and habits—try calibrating your sensors with a multimeter this weekend, following detailed guides like those linked earlier, and see how much smoother your laundry routine becomes. Regular, precise diagnostics coupled with mindful maintenance will keep your dryer humming efficiently for years to come. Remember, a little investment in the right equipment today can save you hundreds in repairs and energy costs tomorrow.
Secrets Only Experts Usually Discover About Laundry Dryers
One of the biggest lightbulb moments in my dryer maintenance journey was realizing how small, often overlooked components can make or break heating performance. For example, replacing a faulty sensor or cleaning that obscure condenser in a heat pump dryer sometimes feels like magic—yet it’s just proper knowledge in action. I’ve learned that every component, from the igniter to the sensors, holds a story that can explain if your dryer refuses to heat. The key is not just knowing what to check, but understanding why certain issues crop up, which prevents repeated failures and extends your appliance’s lifespan.
My Go-To Tools and Resources for Dryer Success in 2026
Over the years, I’ve curated a set of tools that have truly transformed my maintenance routine. A reliable multimeter, like the Fluke 117, helps me verify electrical components accurately, while specific diagnostic apps linked to my smart dryer alert me to pending issues before they become costly repairs. For DIY troubleshooting, I trust guides like this ignition test guide to safely assess my gas burner’s health. These resources, combined with a bit of patience, empower me to handle most issues confidently—saving both money and stress.
Your Next Step Toward Dryer Mastery
Taking command of your laundry routine isn’t just about fixing individual problems; it’s about embracing a proactive mindset that keeps your gas or heat pump dryer performing at its best. Think of diagnostics and preventive maintenance as modern tools—like a fitness tracker for your appliance—that help you spot signs of trouble early. By investing in proper tools, consulting trusted guides, and dedicating a few minutes regularly, you can enjoy consistent, efficient drying and avoid unexpected breakdowns. Remember, every effort you put into understanding and maintaining your dryer now will pay off with quieter operation and longer lifespan in 2026 and beyond.
What’s the one maintenance habit you’ve found most effective for keeping your dryer in top shape? Share your insights below—I’d love to learn from your experience!
Leave a Reply